Start Here

Take the Autolaunch Lineal Optimiser for a trial run now. Follow these simple steps.

Before considering control of the software in depth, it might be a good idea to get a quick flavour of what it can do using the sample data (shown on the download screen).

The optimiser is numerically menu driven (press a number option then press Enter) and without too much explanation at this stage, please follow these simple menu choices.

Start screen


Press Enter at the start up screen

Password screen

Press Enter again and ignore setting the password at this time.

Main Dos Menu

From the Optimiser main menu, Key 1 then press Enter to go to Create Edit or Process Jobs.


Optimiser Menu

From the Create and Edit jobs menu, choose option 3 to load a previous job. (previously saved job).

Current job loaded

This gives a scrollable list of all jobs stored. When first installed, there is only one job,so simply press Enter to accept the job shown. The current job box, is now filled in at the bottom of the Create & Edit Jobs Menu screen.

Now please choose Option 2, Edit an existing bar (previously saved). Again there is a scrollable page, though only one choice when the software is first installed. So press Enter and you will move to the individual job item setup screen shown below.

Job item all details shown

The right hand side of this screen shows the additional options that are attributed to the function keys. Let's immediately press F9 to see the optimised cutting list on screen. The Up and Down cursor arrows allow you to see the entire form. Press Page Down to see the final purchase result and wastage.

To leave this job input screen, press zero when the cursor is in the Quantity box, then Enter.

The input focus remains in the Quantity box unless you type a number then press Enter, in which case you will be adding an additional item to cut and must continue with both length and reference text before the input focus returns to quantity. Whilst on this input screen, why not add more items to cut, then press F9 when the input focus is in the Quantity box to see how the sizes you added are optimised cut? After the seventh line has been added the items window scrolls up, allowing up to 100 different sizes to be cut.

Back button

Autolaunch documents

Important setup before using the Lineal Optimiser

Before using the Lineal Optimiser, there are a few things that should be set up for your personal use.

  • Printer driver configuration (Though it's likely that it will work just fine)

  • Standard defaults for new bars to cut (Optional but advised)

  • Password for protected menu items (Optional)

  • Define standard materials frequently cut, then available from a drop down list (Optional as job input allows easy "on the fly" material descriptions)

Back button

Autolaunch documents

Printer driver configuration

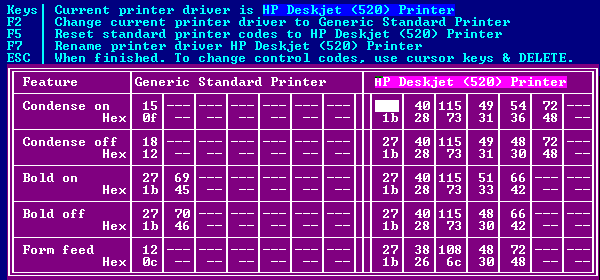
If you have installed the version with Vdos, the chances are that you won't need to alter this printer driver.

Being a DOS program, programs send special control characters to the printer to achieve certain printer functions such as condensed print. This unfortunately varies depending on the printer that is attached to your computer and there are thousands of printers to cater for! Fortunately, for most cases, there are only two key different sets of control codes and they are already set on the system. By default, the software is configured to suit Hewlett Packard printers which should also cover most other modern printers. The default printer driver is always shown at the bottom of the main menu screen.

Current priner driver from the main Optimiser menu

Main Optimiser menu


To change the printer driver configuration, from the main Optimiser menu shown below, choose option 6 Set personal preferences

Personal preferences menu


From the personal preferences menu choose option 2, Select/amend printer drivers

The multi-function screen below allows you to easily interchange standard printer driver codes, restore original code settings or create special, one off printer code setups.

To change the printer driver codes to suit other than an Hewlett Packard printer, press F2. The top line will reflect this change and will show Current printer driver is Generic Standard Printer. If this was the only change required, then press Escape then choose option 7 to leave personal preferences.

Multi-function printer driver screen

If neither of the two standard printer driver code sets is suitable for your printer, then you will have to type in the decimal codes to suit the features details above. Older printer manuals, did contain this information, but nowadays it is more common to go to the printer manufacturer's web site and search, generally under the topic support. When you have these decimal (not hexadecimal) codes, use the cursor arrows to navigate to the appropriate box and type them in, the press Enter. To delete a code, navigate to the square, then press the Delete key. If you do need to change any of the printer codes, it is a good idea to press F7 and rename the printer driver. This new name will then be shown on the main optimiser menu.

Back button

Autolaunch documents


Standard defaults for new bars to cut

Main Optimiser menu

From the main optimiser menu, choose option 2 to Read/amend Optimiser defaults.


Parts and defaults menu

From the Parts and default menu choose option 2, Read/amend default values.

This menu allows the user to set their own default values and text strings for a variety of elements used when creating a new bar to cut.

Initial default sizes for new bars to cut

  • Option 1 enables setting the default length to be offered when creating a new bar to cut.

  • Option 2 is to define what length of the standard bar is deemed unusable. For example, painted aluminium extrusions have holding tong marks for the painting close to the end of the bar. This must be trimmed off first. The setup below ensures that the optimisation cutting logic, will only consider the bar to be 6350mm long (leaving a total of 50mm to be trimmed off).

  • Option 3 sets the loss that occurs each time the saw blade cuts a piece. Again the optimisation logic will reduce the remnant length by this amount after a piece has been allocated to be cut.

  • Options 4 & 5 are values against which a warning is given to the user, if they choose to override the default settings by a higher amount. It should prevent a user from accidentally setting a value too high. For example, 5000mm of unusable bar would prove very costly if undetected as the optimiser could only consider a length of 1400mm.

Press Enter at the, Key option prompt to return to the Parts and defaults menu.

Back button


Password for protected menu items

Parts and defaults menu


From the Parts and defaults menu, choose option 7, Change password.

Changing password screen


As there is no password set with the original installation, the screen below is directly accessed.


Type in your new password then press Enter. This leads to the confirm password screen below. (If spaces are included, the password is rejected).

Confirm password

Repeat the password and press Enter. This returns to the Parts and defaults editor menu unless the two passwords are not the same. If a mistake is made, the process has to be completed until it is correct.

  • Remember your password.

  • Password protected menu options will become unavailable if you forget your password.

  • If you do forget your password, please refer to Autolaunch for assistance.

  • Do not reinstall the program as all your personal and job data will be lost.

Back button

Autolaunch documents

Create standard bar parts frequently cut

Main Optimiser menu


From the main optimiser menu, choose option 2 to Read/amend Optimiser defaults.

Parts and defaults menu


From the Parts and default menu, choose option 1, Create/amend standard bar parts.

This screen displays the standard parts that have already been created. The top line shows the current page number (1) and the part numbers available to this page (range 1-14).

Standard parts list

New part box

To create a new part, type a number not already used within the range (for this page 5-14) and press Enter. For this example using part number 5 produces the following dialogue.

Pressing Enter takes us through the following sequential steps:-

New part name

Type the text name for the part, then press Enter.

Set standard length of bar

Either press Enter to accept the systems default length (in this case 6400mm), or type a new value, then press Enter.

Set weight

Whist the system allows a weight to be set, the software does not actually use the value.

New part has been added

The new part has now been added and will be available from the drop down list in the optimiser when creating a new bar to cut.

Pressing Enter at this point steps through the other 17 potential pages of parts. Choosing a part number already displayed on this page enables it to be edited. Keying 999 then Enter will leave the Parts list and returns to the Parts and defaults editor.

Back button

Autolaunch documents

Change default finishes (Colours/Material) & end cut preparation

The default finishes that come with the Autolaunch Lineal Optimiser are suitable for various anodised aluminium finishes. However, these text labels can be changed to anything suitable for the materials that your company traditionally cuts. The same applies to the default end preparation of the cut, mitred cut square cut etc.

From the Parts and defaults menu, choose either option 3, change default finishes or option 4, Change default bar end preps.

Parts and defaults menu

The details of changing finishes and end prep is identical, so this tutorial will use the finishes as an example by choosing option 3.

Default finishes

Type the number of the item to edit, then press Enter. This example will choose option 1, currently MILL FINISH.

Option 1 choosen

Type the new text label then press Enter. for this example type, NEW TEXT LABEL.


Text label replaced

Option 1 has now changed to NEW TEXT LABEL. We entered this in the previous step. To return to the Parts and defaults editor, simply press Enter.

 Repeat this procedure for the text labels for default bar and end prep.

Back button

Autolaunch documents

This concludes the initial setup help from General Help. The full manual is available from Direct Menu help.

Autolaunch logo © Clive Brooker 2001 - 2020

Back button